The following steps are important when changing a belt drive garage door opener. What are the basics about a belt drive garage door opener? Most belt drive garage door openers are quieter compared to the chain drive garage door openers hence its more expensive than the chain garage door opener.
It’s important to note that the whole process will take some time so it’s highly recommended you create time (about three hours) for the garage door opener installation process. Check your ceiling and confirm whether you need some blocking up in the ceiling Confirm you have all the tools and parts that you will use during the installation process.
Always double check your instructions, found in the instruction manual before starting the below steps of installing a garage door opener.
Mount the operating plate on the garage door, make sure you find the center mark of the door , this is done by use of a tape measure ( operating plates come with their screws)
Align the center of the bracket to the center of the door that you have just marked (avoiding stripping your screws)
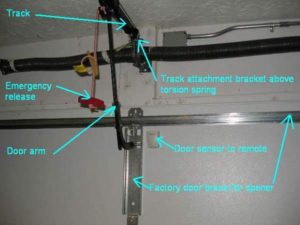
Install the bracket on the wall where the arm of the garage door opener will be mounted.
Determine the height of the header bracket.
Create a center line that is continued upwards from the operating plate. Then mark it.
Determine the highest point of travel of the opener when the garage door is opening.
Pull the garage door open by hand and using your eyes determine the highest point of travel. Confirm this when the top part of the garage door gets as high as it can possibly be. Make a level mark on the wall. Create another mark 2 inches above the previous mark.
Drill a couple of holes on the wall in order to have solid blocking.
Hold the bracket on the center line, and then drill the holes.
Mount the bracket on the wall.
Assemble the rail system of the garage door opener.
Take the parts of the extension piece and fit them together. Refer to the instruction manual for directions.
Make sure you attach the extension piece bracket as well.
Then attach it to the actual motor housing.
Install the rail on the motor housing.
Slide on the rail the mechanism that pulls the garage door back on forth when operating.
Stick a screw driver so that it doesn’t slide on your face when lifting the rail.
Install the belt on the rail; refer to the instruction manual on which end of the belt goes into which end of the rail.
Then place the pulley and the bolt on the other end of the rail.
Use a special bolt provided to lock the bolt and the pulley.
Place the stud bolt on the very last hole of the rail track its intended to help the carriage not to go too far
Bring the belt around the actual drive and wrap it on the motor.
Make sure the belt isn’t twisted at any given point.
Guide the belt round the rail onto the motor housing and try to put some tension on it.
Get it round the sprocket that has been already mounted on the motor.
Perform the tightening mechanism for the belt itself.
Attach it to the chain neck at the end of the belt and pop it onto the rail.
The place it onto the carriage on the rail, hand tighten the nut.
Cover the pulley section of the motoring unit with a cap.
Fix the end of the rail facing away from the motor housing to bracket that was placed on the wall.
Open the overhead door manually.
Check how leveled the rail is.
Mount the brackets on the motoring house that will hold up the motoring house.
Tighten the bolts on the motoring house.
Mount a bracket through the door that will hold the garage door opener arm.
Tighten the bolts on the rail track.
Fix the garage door opener arm; refer to the instruction manual for more guidance. Make sure the holes are perfectly aligned.
Install the handle and a rope for the emergency release. Make sure the rope is long enough.
Slide the handle onto the rope and determine how far you can reach to it.
Mount the sensors. They should be at the same height so that they align up.
Snap the brackets on the two sides of the wall of the garage door. (If your sensors came with mounting brackets) the bracket should not be mounted more than 12 inches.
Install the sensors on the brackets.
Mount the wall button to the wall. Refer to the instruction manual on how to wire the wall button.
Pre-strip all the wires that are to be wired into the motoring house.
Place the wires into the motoring house; refer to the instruction manual for guidance.
Remember to pair up the wires form the sensors before mounting them into the motoring house.
Cover the motoring unit.
Plug the opener to the power supply.
Double check the lights on the sensors, make sure the solid colors of green and yellow can be seen.
Switch on the garage door opener and try it out.
Adjustments can be made on the garage door opener depending on how high it’s supposed to open or how low it should be when closing.
Adjustments can be made on the side of the garage door motoring house.
The adjustment buttons will bale to adjust the track. Do not do too many revolutions.
Try opening and closing the garage door.
Check the force
Stand on the garage door path, don’t block the sensors. Place your arm and when the garage door goes down when closing, try to resist it slightly. It should be able to go back if it doesn’t then adjustments should be made.
Try opening and closing the garage door, make sure the upward and downward forces are perfect.
Program your remote so that it can be able to function properly on your garage door opener. Push the LAN button on the motoring house then push the control button on the remote control.
Your garage door opener is now ready to use.
Have the Pros at C and M Garage Doors Do It! —702-655-3667